
Accounts and Passwords
-
The default password for logging into OVTX is changeme. A valid email address is required to change the default password. If a valid email is not available the default password cannot be changed.
-
The OmniVista ID is displayed in the top right corner of the OmniVista Admin Center.
VM Backup and Maintenance Guidelines
The following are recommended procedures for VM Backup and Maintenance.
-
VM snapshots without memory are the recommended method for backups.
-
When snapshots with memory are taken, the OVTX UI and Admin Center will be temporarily inaccessible. If done on the main node this may also cause another node to be promoted to take its place.
-
Old VM Snapshots should be deleted regularly to prevent performance degradation. Keep one VM snapshot at a time to avoid performance degradation.
Cluster and Node Guidelines
If a node disconnects from the cluster due to a power cycle or loss of network connectivity, note the following
-
From 0–10 minutes: Downtime occurs and the system is not accessible.
-
At the 10th minute: Users can access the UI (Web Admin and OVTX), but cannot perform any actions since some services are still not stable.
-
At the 15th or 20th minute or later: Users can access the UI and perform actions as expected.
Replace or migrate a node
-
You can add a new virtual machine to expand an existing OmniVista Terra cluster or replace a failed node. This operation is certified on:
-
VMware vSphere
-
Microsoft Hyper-V
-
Proxmox VE
-
When adding a new VM, the cluster automatically rebalances services and data across nodes while maintaining service continuity.
-
You can migrate an OmniVista Terra virtual machine from one physical server to another using your hypervisor's native migration capabilities:
-
VMware vMotion
-
Hyper-V Live Migration
-
Proxmox Migration
-
The HA L2 cluster supports a 3-node setup ONLY.
In the event of two nodes being offline, OVTX becomes unavailable.
OmniVista Terra Installation
Certificate Error
If a certificate error similar to one below is seen in the install log run the installation process again.
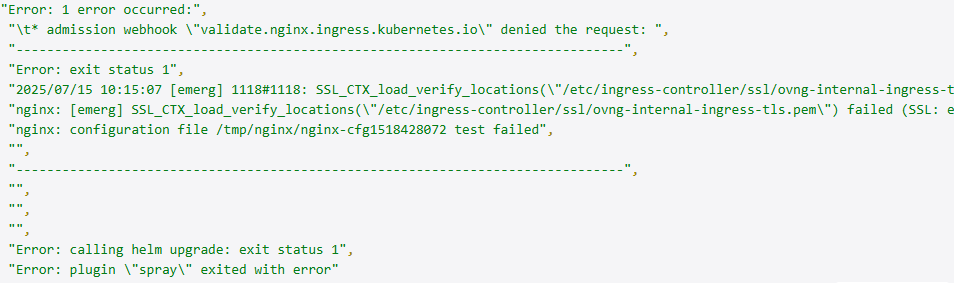
Perform the following to re-install.
-
Access the Web Admin Center
-
Navigate to Install->Release Files
-
Click Install to restart the installation process
Unapplied settings; new deployment required
The "Unapplied settings; new deployment required" tag is displayed after the OVTx deployment failed. At the Quick Redeployment screen check create-user to create a default account.
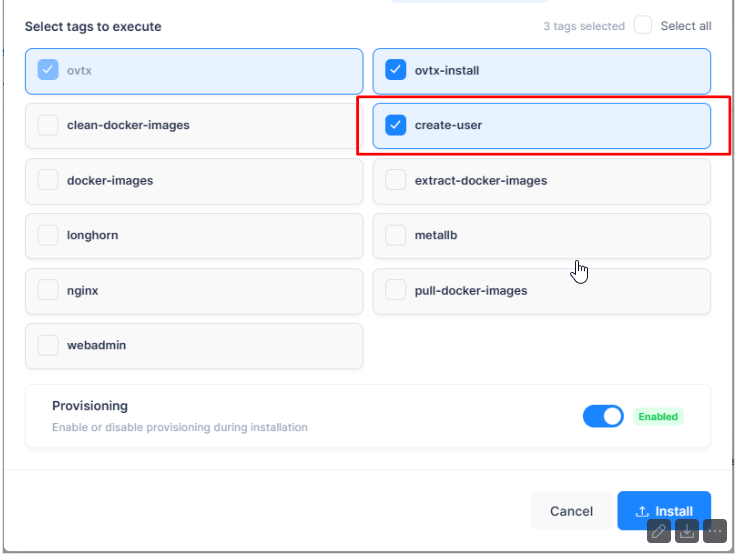
Appliance Import or Extraction Fails
Confirm that the OVTx 10.6.1 appliance .run file has execute permission. Run chmod +x <ovtx-10.6.1-appliance>.run if needed. Verify that the file is in your chosen working directory (for example /tmp) and that you are running the command from that directory.
Wrong Network Bridge Selected
If you selected an incorrect bridge during import, the VM will not receive an IP on the expected subnet. Delete the VM from Proxmox and re-run the installer, selecting the correct bridge this time.
Wrong Storage Type Selected
Use a storage backend that meets the required performance profile (SSD or NVMe-backed storage). If an incompatible storage type was selected, delete the VM and re-run the installer with a supported high-performance storage backend.
First-Boot Configuration Errors
If you entered incorrect network values during first boot, log in to the VM console with the ovtx user and re-run the configuration script to apply the correct values. After saving, run ip addr to verify the new settings.
Admin Center Not Opening After First Boot
Confirm that the VM is powered on and that the first-boot configuration completed successfully. Verify the IP address by logging into the VM console and running ip addr. Check that your browser can reach http://<node-IP>:3000 and that no firewall is blocking port 3000.
Nodes Not Reachable During Cluster Setup
Verify that each node VM is powered on and that its IP address was applied correctly (run ip addr in the console). Confirm that all nodes are on the same subnet and that no firewall rules are blocking traffic between nodes.
Installation Fails on the First Attempt
Click Install again in the Web Admin Center left menu. A second attempt often succeeds. If it fails again, click Download Logs to retrieve the installation log files and review the error messages for the root cause.
Pods Not Healthy After Installation
Wait a few minutes after the installation completes, as pod startup can take several minutes on first launch. Refresh the dashboard to reload the pod status. If pods remain unhealthy, review the installation logs by clicking Install in the left menu and then Download Logs.
Browser Cannot Resolve myovterra.myovcloud.com
Verify the hosts file entry at C:\Windows\System32\drivers\etc\hosts. The line must contain the OmniVista Terra Main IP address followed by myovterra.myovcloud.com. Ensure the file was saved after editing. If you are using a DNS server, confirm that the A record resolves to the correct IP.