
The License Management screen provides details about the Organization's OmniVista Terra License. Licensing depends on your purchased subscription, which allows you to manage up to the maximum number of devices permitted for the duration of the subscription contract.
You have to obtain a paid license subscription from your Business Partner before you can import licenses for your Organization.
There are two ways to access the License Management screen for the current Organization:
-
Click on the License Status shortcut located on the Organization Dashboard.
-
On the Organization Dashboard, click on the License Management option under the “Organization” section of the OmniVista Terra Menu.
If you purchased a CAPEX Subscription for your Organization, the License Management screen displays the following device license information:
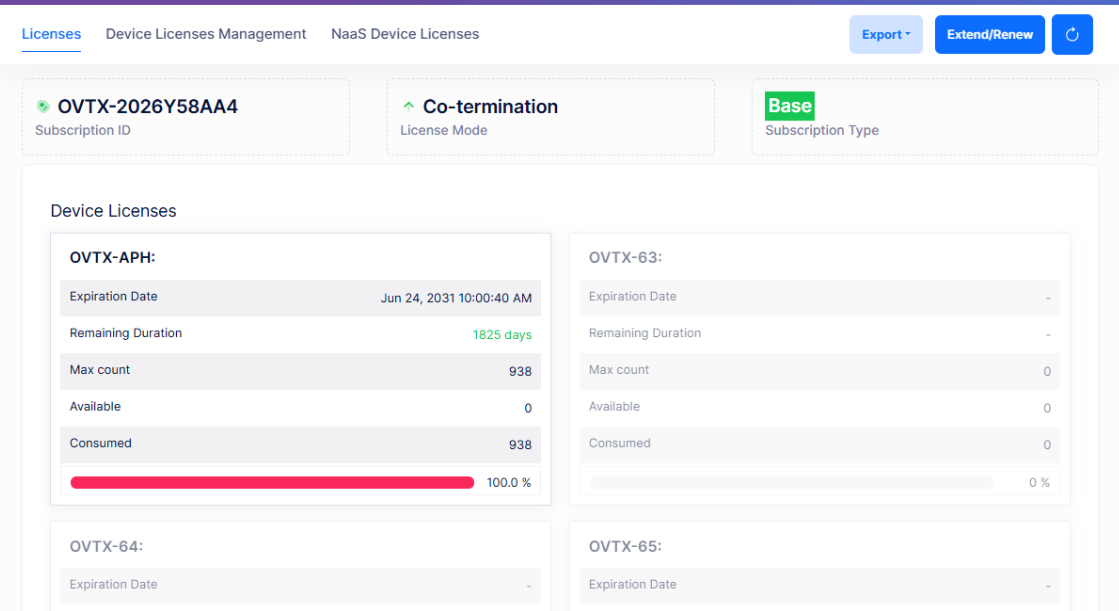
The License Management screen for the CAPEX Subscription model provides an overview of the licenses purchased and activated by the user, including the start and end dates for the license as well as the number of devices that can be managed with the current license.
There are three License Management screen tabs:
-
Licenses - Provides an overview of the licenses purchased and activated by the user, including the end dates for the license as well as the number of devices that can be managed with the current license.
-
Device License Management - Allows you to manage device licenses by assigning or releasing licenses. You also have the option to set up auto-assignment for licenses when creating a new device.
-
NaaS Device Licenses - Displays the Network as a Service (NaaS) licensing information for managed network devices.
Licenses
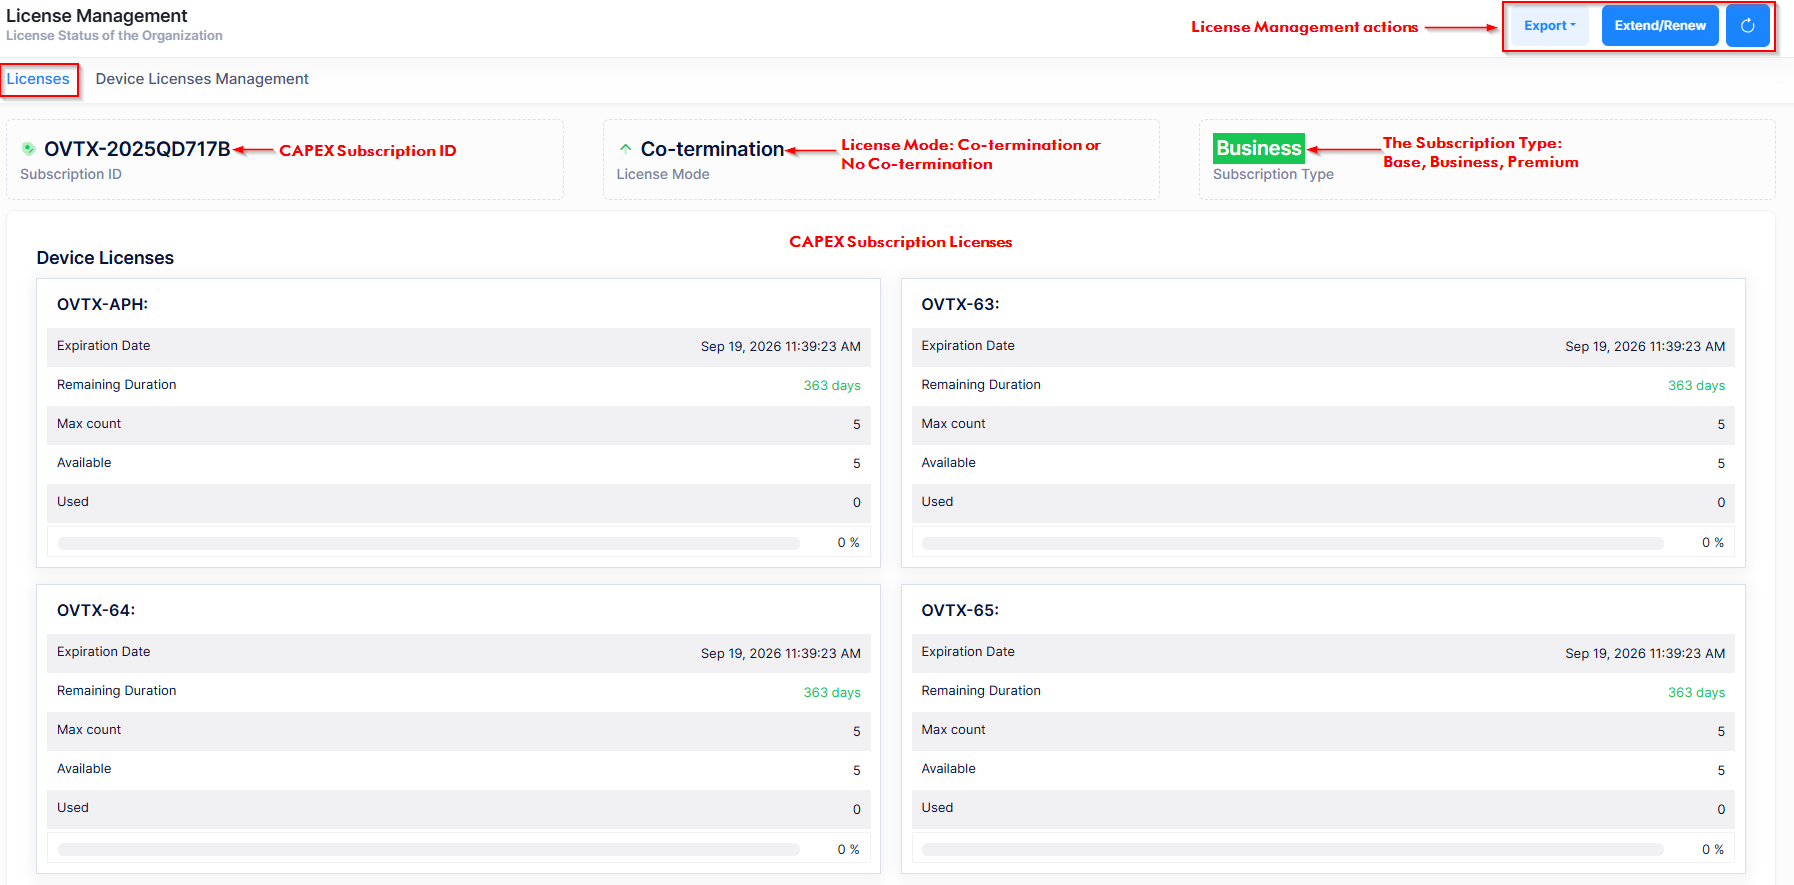
The Licenses tab displays the licenses purchased for the CAPEX Subscription.
-
The top section of the Licenses screen provides information about the purchased licenses:
-
Subscription ID - The unique subscription identifier (e.g., OVTX-2026Y58AA4).
-
License Mode - Whether the subscription is a Co-termination or No Co-termination license.
-
Subscription Type - The Service and Support bundle for the type of subscription.
-
Base - No service and Support bundle (Support Plus/AVR associated with the part)
-
Business - Business Service and Support bundle included (Business/Partner Plus level with AVR)
-
Premium - Premium/End customer level bundle included (Premium/End customer support with AVR)
-
-
Below the header, the Device Licenses section displays a card for each license category. Each card shows:
-
Category name - The category of licenses (e.g., OVTX-APH, OVTX-APL, OVTX-ASL-MGT, OVTX-3PD-MGT).
-
Expiration Date - The date when licenses in this category expire.
-
Remaining Duration - Number of days remaining until expiration (shown in green when active).
-
Max count - Total number of licenses allocated for this category.
-
Available - Number of licenses not yet assigned to devices.
-
Consumed - Number of licenses currently assigned to devices.
A usage progress bar showing the percentage consumed.
License categories by deployment:
The following license categories are available:
-
-
OVTX-APL - Stellar AP Low End
-
OVTX-APH - Stellar AP High End
-
OVTX-63 - OS63 Series Switches
-
OVTX-64 - OS64 Series Switches
-
OVTX-65 - OS65 Series Switches
-
OVTX-68 - OS68 Series Switches
-
OVTX-69 - OS69 Series Switches
-
OVTX-99 – OS99 Series Switches
-
OVTX-ASL-MGT - Legacy OmniSwitch (6X) management licenses.
-
OVTX-3PD-MGT - Third-Party device management licenses.
-
OVTX-OXE-U - PBX user licenses.
-
AP license categories are now based on specific AP models. It is possible to use an APH license for any supported AP models, even models that use an APL license when there are not enough APL licenses available. For example, when sufficient APL licenses are available, models that use an APL license will prioritize using an APL license and cannot be assigned an APH license. Only when there are not enough APL licenses will those models use an APH license. For “Allow users to manually assign an APH license to manage an AP that requires an APL license,” disable Auto Assignment in the Device License section.
-
The upper-right corner of the Licenses screen provides the following License Management actions:
-
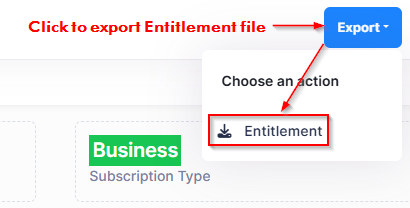
Export - After the CAPEX Subscription licenses are imported or additional licenses (add-ons) were purchased, click on Export to download an Entitlement File. This file identifies the devices assigned to the licenses for the CAPEX Subscription. Send the Entitlement File to your Business Partner, who will then upload the file into Subscription Manager to track and manage licenses for your Organization.
-
-
Extend/Renew - If add-ons were purchased to extend or renew licenses, click on Extend/Renew to upload the Subscription File for the add-ons.
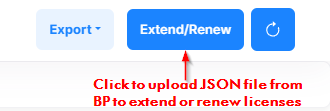
The following Extend/Renew window opens.
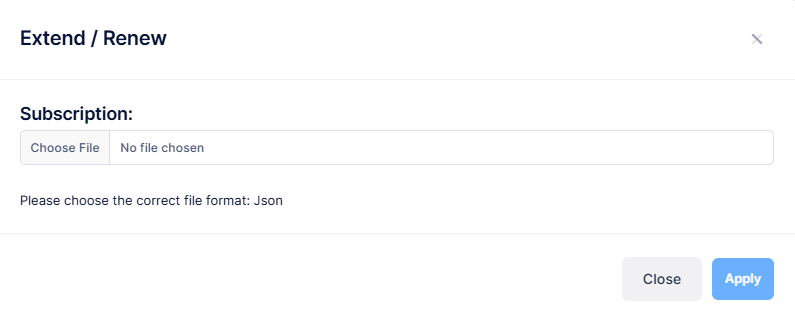
Upload the Subscription File (provided by your Business Partner) for the activated add-on licenses, then click on Apply. The Device Licenses display is updated with the information uploaded from the Subscription File.
-
Refresh - Update to the latest subscription information.
Device Licenses Management
The Device Licenses Management screen is used to manage device licenses. This includes assigning and releasing licenses for selected devices. When you click on the Device Licenses Management tab, the following steps are available for configuring and managing device license assignments.
Step 1. Settings
The Settings screen allows you to specify whether you want licenses automatically assigned to device(s) when the device is added to the Device Catalog.
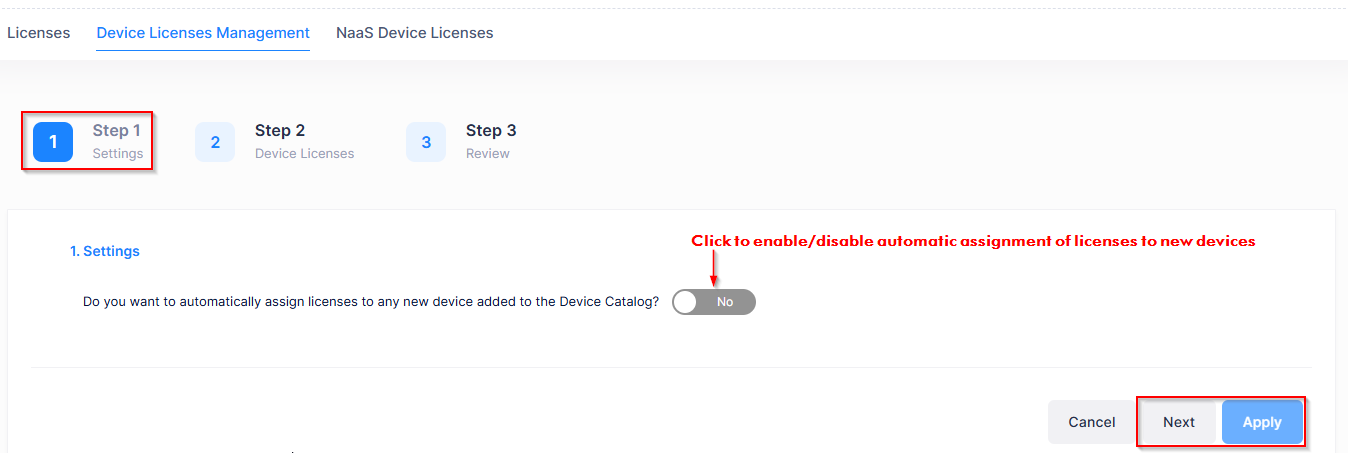
-
If you set the automatic assignment status to “Yes” (enabled), a license is automatically assigned to a device when the device is added to the Device Catalog.
APs running in Express mode will lose their existing configuration when they get licensed and managed by OmniVista Terra.
-
If you set the automatic assignment status to “No” (disabled by default), the device is added to the Device Catalog without a license until you manually assign a license to the device. See Using the Device Catalog online help for information about manually assigning or releasing device licenses.
Once you have set the status for automatic license assignment, click Apply to apply the status change or click Next to go to “Step 2 Device Licenses”.
Step 2. Device Licenses
The Device Licenses screen allows you to assign or release licenses for the selected device(s). This screen also provides information about how many licenses are available in each CAPEX license category.
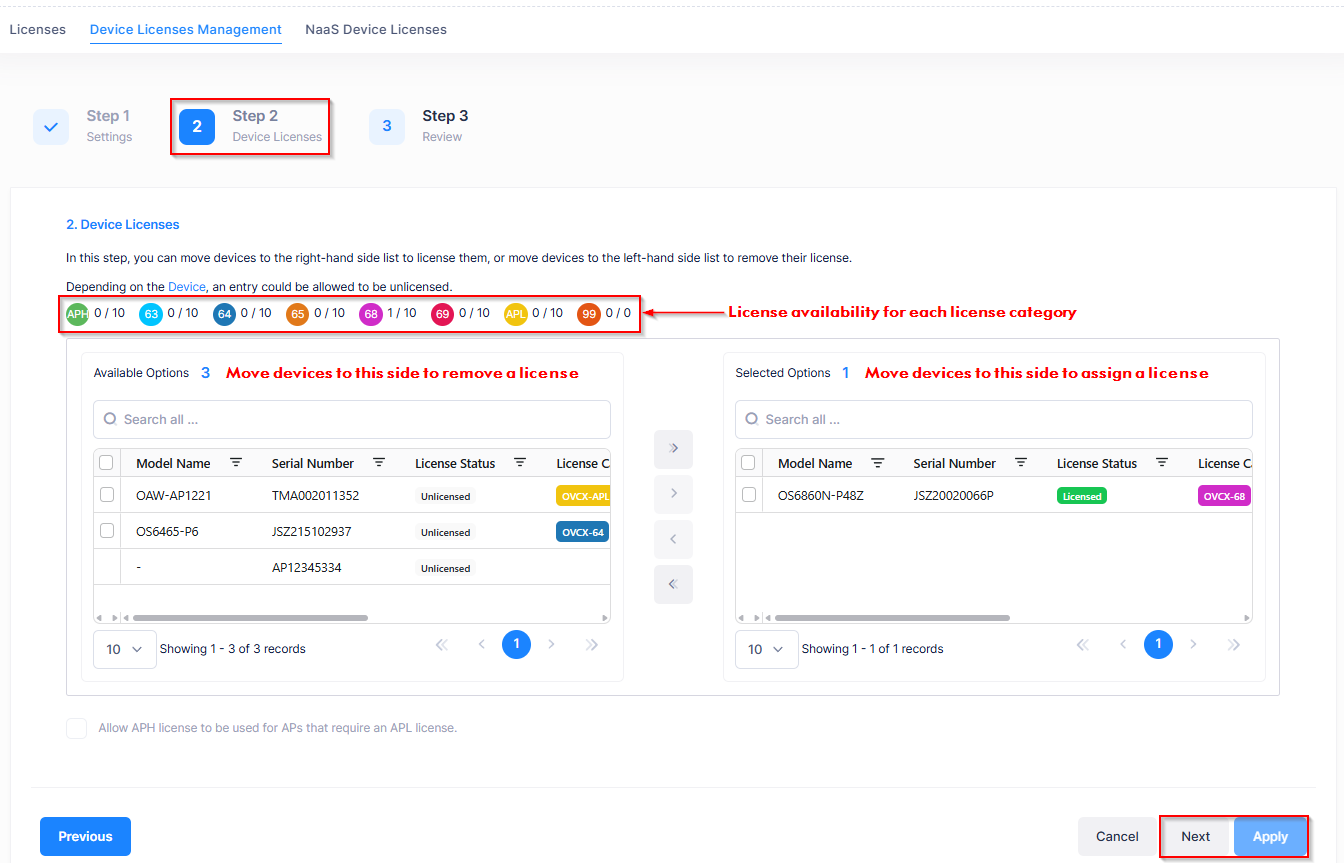
-
To assign a license to a device, move the selected device(s) from the left (Available Options) to the right side (Selected Options).
-
To release a license from a device, move the selected device(s) from right side to the left side (Selected Options) to the left side (Available Options).
If any license assignment exceeds the assignment limit for the license category, a warning color appears to indicate which device licenses are violating the limit. This prevents you from assigning licenses for those devices until you resolve the licensing limit.
Once you have completed selecting devices for license assignment and/or for releasing a license, click Apply to apply licenses to the selected device(s) or click Next to go to “Step 3 Review”.
Consider the following when releasing device licenses:
-
When a device becomes unlicensed (license is released) or the license grace period ends, the unlicensed device is no longer manageable by OmniVista and the device activation status moves to “Register”. However, all the device data known to applications (such as Device Catalog, Topology, Network Analytics, etc.) is still retained by OmniVista and displayed in the UI.
-
All known device data is only removed from the OmniVista UI when the device is deleted from the Device Catalog.
-
When you release a license assignment from an AP device, the device does not immediately reboot to reset the AP Management Mode. Instead, The AP remains managed by OmniVista until the next call home (15 minutes by default), when the AP Management Mode is changed to Cluster. Once in Cluster mode, license assignment is required again for OmniVista to manage the AP.
Step 3. Review
The Review screen displays the maximum number for each license category and the number of licenses that will be assigned.
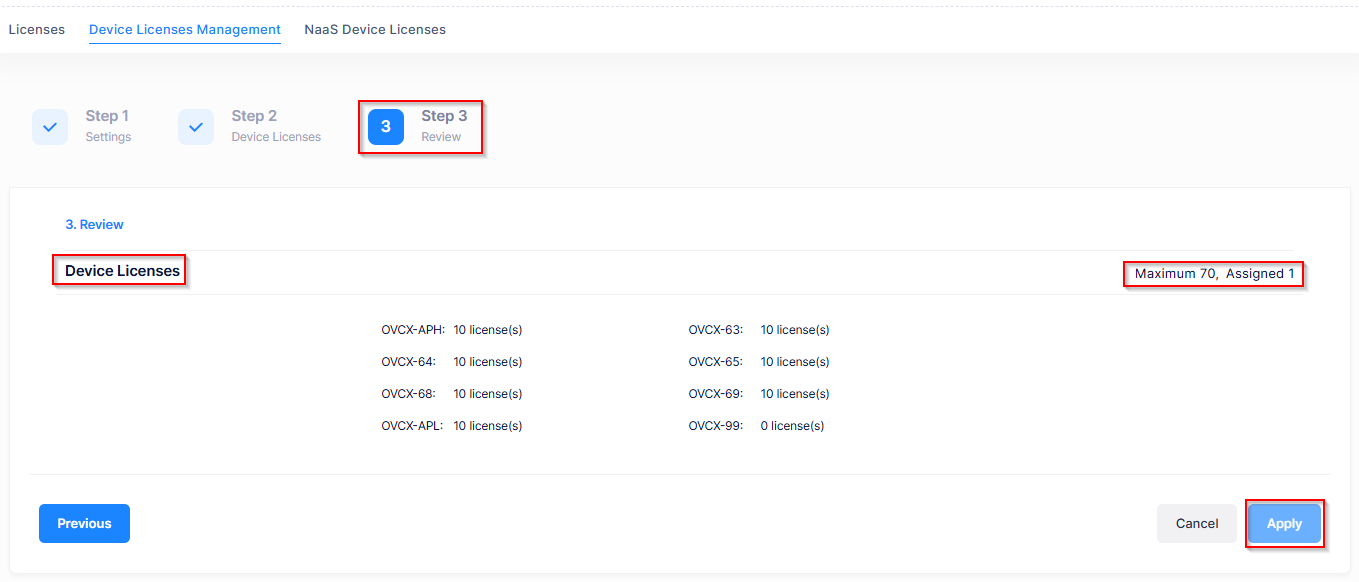
Click on Apply to complete the license configuration and management process.
Automatic License Assignment on Device Creation
When you create or import a 6X or third-party device on OmniVista Terra with a paid subscription:
-
The system checks whether an OVTX-3PD-MGT license is available.
-
If a license is available: The device is created, the license usage count increments, and the device's license category is set to OVTX-3PD-MGT.
-
If no license is available: The device is created with an Unlicensed status, but the license category is still set to OVTX-3PD-MGT.
-
When you delete a third-party device, the OVTX-3PD-MGT license usage count decreases and the license returns to the available pool.
License assignment priority options:
When creating devices, you can choose how OmniVista selects which license to assign:
-
Choose licenses that expire last - OmniVista selects licenses with the largest remaining duration. Licenses that are already activated are preferred over licenses that have never been used.
-
Choose licenses that expire first - OmniVista selects licenses with the smallest remaining duration. Only licenses that are available and have some operational period left are considered.
If a device displays "Unlicensed" after creation despite a paid subscription, your organization may have consumed all licenses in the relevant category (for example, OVTX-3PD-MGT or OVTX-ASL-MGT). Newly created devices are placed in the correct license category but remain Unlicensed. Import additional licenses via the add-on or renewal process, then manually assign a license from the Device Catalog License screen.