
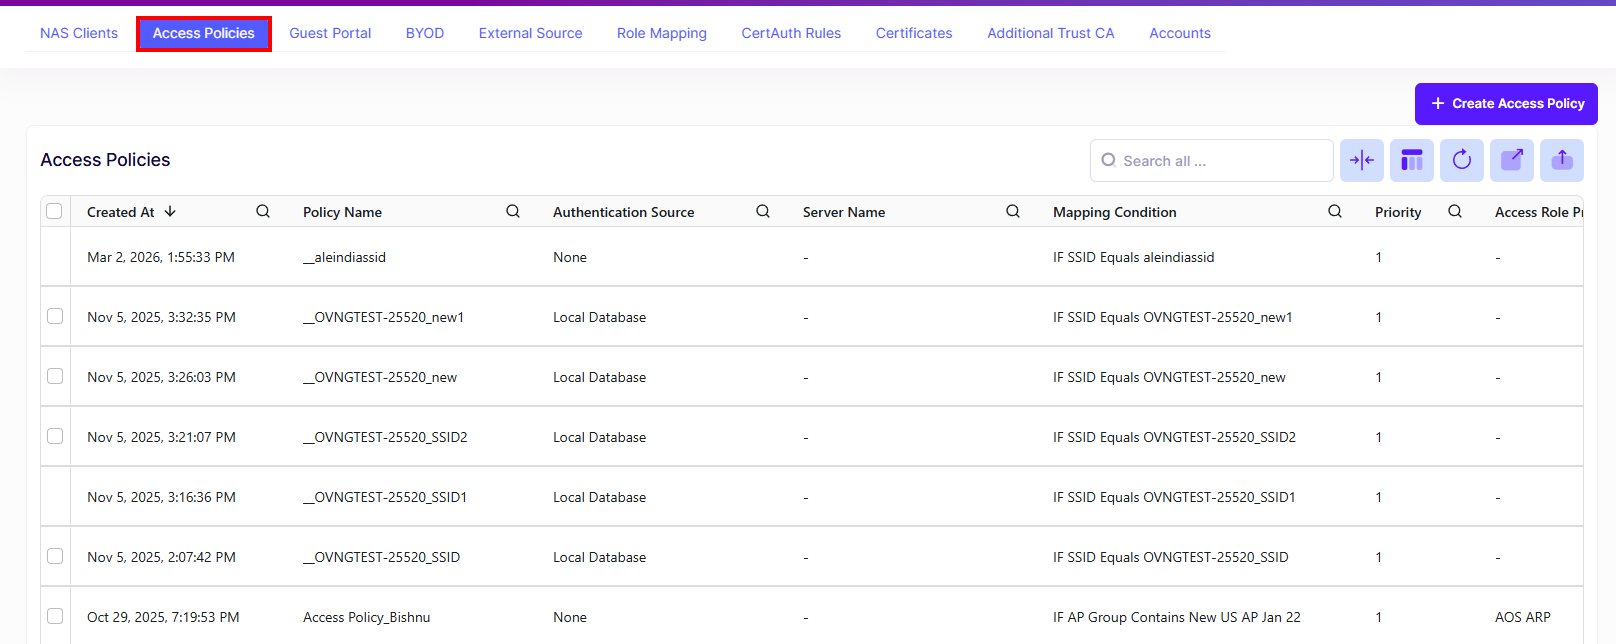
Access Policies are used to define the mapping conditions for an authentication strategy. Through Access Policy configuration, authentication strategy is applied to different user groups, which can be divided by SSID or other attributes. The Access Policy Screen displays all configured UPAM Access Policies and is used to create, edit, and delete Access Policies.
To access the Access Strategy screen, click on Auth & Automation > UPAM-NAC > Access Policies under the “Configure” section of the OmniVista Terra Menu.
Creating an Access Policy
You can create a maximum of 32 Access Policies.
Click on Create Access Policy to bring up the Create Access Policy Screen. Use this screen to define the following attributes for an Access Policy configuration:
When you are done configuring the attributes for the Access Policy, click on Create Access Policy.
Basic Information
-
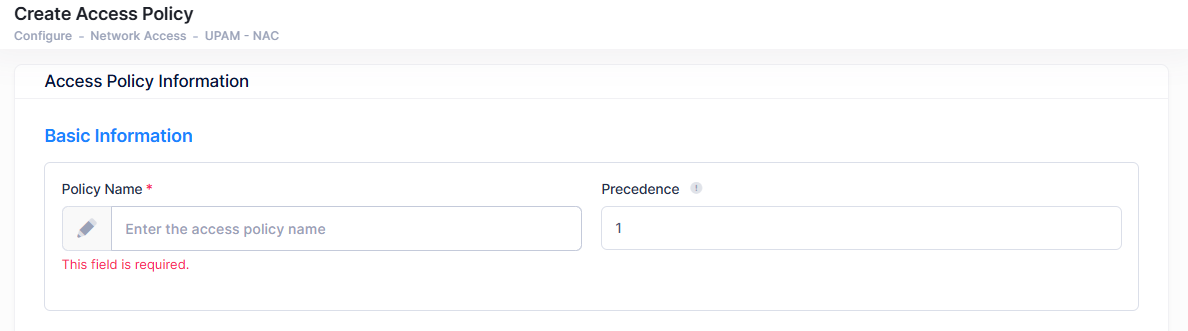
Policy Name - User-configured policy name.
-
Precedence - Specify Access Policy Priority. A user requesting authentication may match several access policies and the one with highest priority will take effect after passing the authentication.
(Range = 1-99, 1 is the highest priority and 99 is the lowest priority)
The Access Policy that you create or select defines the Authentication Strategy that UPAM applies when a client connects to the SSID. However, the Access Policy displayed for the SSID configuration is not always the policy used for authentication when the client is connecting to the SSID. This can occur if there are multiple Access Policies with the same precedence and overlapping rules configured through the Access Policies screen (Configure > Network Access > UPAM-NAC > Access Policies).
When a client connects to the SSID, UPAM selects the Access Policy with the highest precedence and evaluates whether its mapping rules align with the client’s connection request. If a match is found, the associated authentication strategy is applied. If two Access Policies with the same precedence have identical mapping rules, UPAM defaults to the policy created first. This behavior may lead to unexpected results.
To prevent ambiguity, ensure that:
a) There are no Access Policies with overlapping rules, or
b) Access Policies with overlapping rules have different precedence. You can adjust the policy precedence configured for the Access Policies (Configure > Network Access > UPAM-NAC > Access Policies) to address these issues.
Mapping Condition
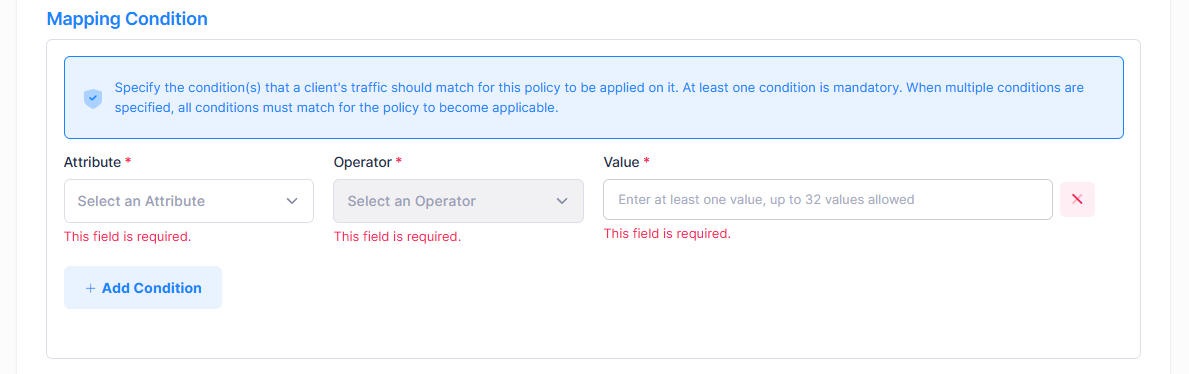
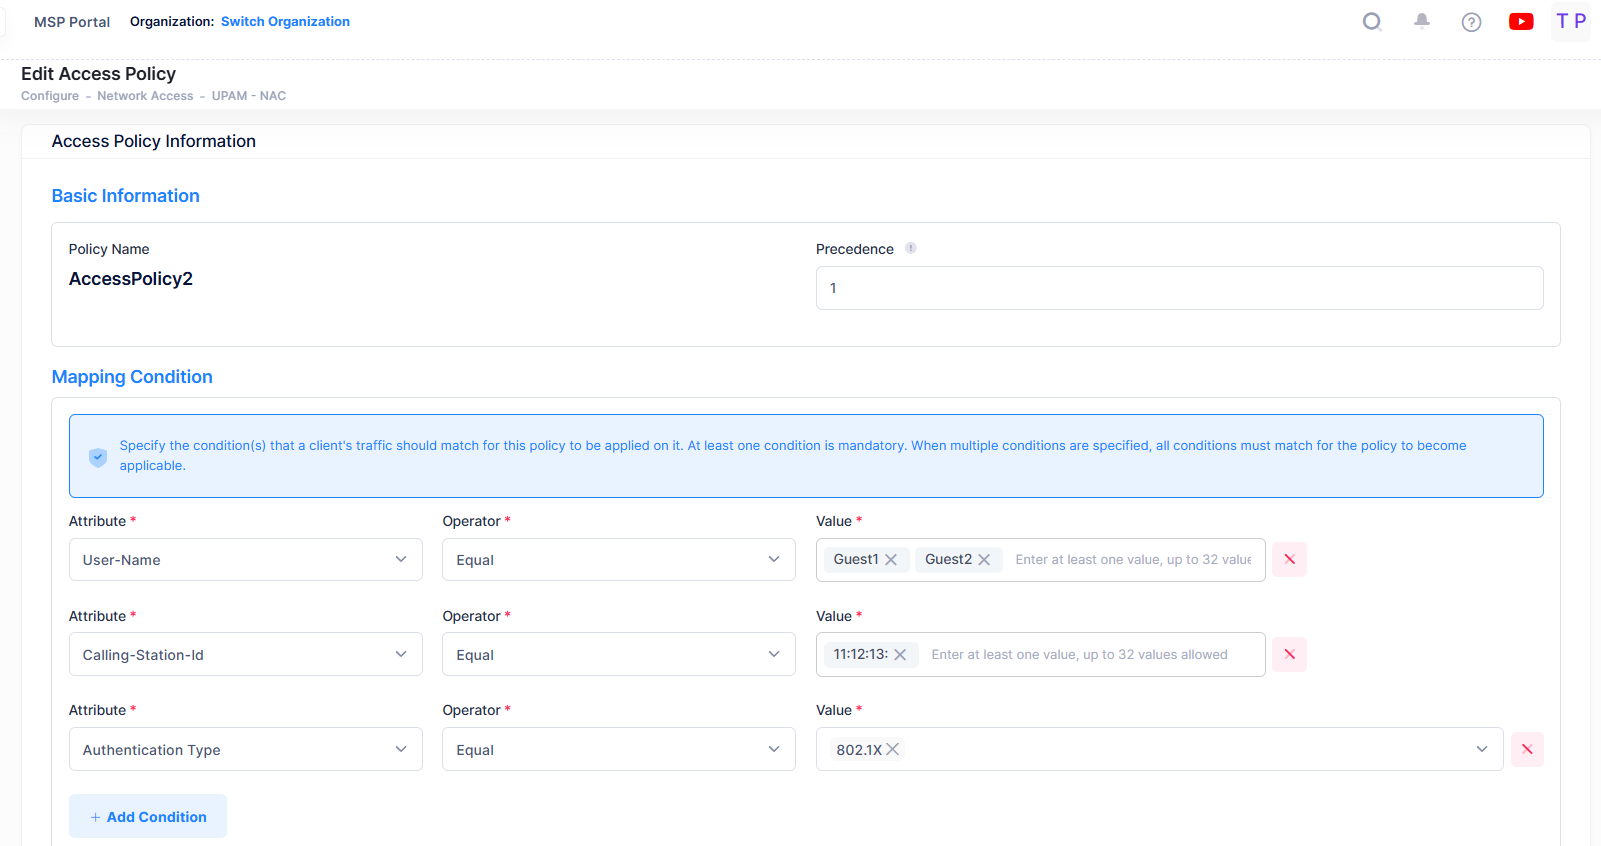
Mapping conditions specify the conditions that client traffic should match for this policy to be applied to the client. At least one condition is mandatory. When multiple conditions are specified, all conditions must match before the policy is applied.
-
Attribute - Select the Attribute (Basic or Advanced Attribute type) from the drop-down list.
-
Basic Attributes -
-
Authentication Type
-
802.1X - 802.1X authentication.
-
MAC - MAC authentication.
-
-
Network Type
-
Wired - Wired network.
-
Wireless - Wireless network.
-
-
SSID - Wireless network SSID.
-
NAS IP - Enter the NAS IP address.
-
NAS Identifier - Enter the NAS Identifier.
-
NAS Port ID - Enter NAS Port ID.
-
Port Desc/WLAN Name - Enter a port description of the switch, WLAN name of the wireless network. (Note: "WLAN Name" refers to either the "SSID Service Name" in the “SSIDs” application or the "WLAN Service Name" in the WLAN Service (Expert) application).
-
NAS Device Name - Enter the NAS Device Name.
-
NAS Device Location - Enter the NAS Device location.
-
AP Group - Enter the AP Group defined in the AP Registration application.
-
-
Advanced Attributes -
-
NAS IP Address - Enter the NAS IP address.
-
Service Type - This attribute indicates the service type the user requested or the service to be provided. It may appear in Access-Request and Access-Accept packets. A NAS need not implement every service type and must treat unknown or unsupported types as if it received an Access-Reject.
-
Login User - The user should be connected to a host.
-
Call Check - Used by the NAS in an Access-Request to indicate a call is incoming and that the RADIUS server should return an Access-Accept to answer the call or an Access-Reject to refuse it, typically based on Called-Station-ID or Calling-Station-ID. Such Access-Requests should use Calling-Station-ID as the User-Name.
-
Call Back Administrative - The user should be disconnected and called back, then granted access to the administrative interface to the NAS from which privileged commands can be executed.
-
Voice - Voice service type.
-
Fax - Fax service type.
-
Modem Relay - Modem Relay service type.
-
IAPP Register - IEEE Trial-Use Recommended Practice for Multi-Vendor Access Point Interoperability via an Inter-Access Point Protocol Across Distribution Systems Supporting IEEE 802.11 Operation, IEEE 802.11F, June 2003.
-
IAPP AP Check - IEEE Trial-Use Recommended Practice for Multi-Vendor Access Point Interoperability via an Inter-Access Point Protocol Across Distribution Systems Supporting IEEE 802.11 Operation, IEEE 802.11F, June 2003.
-
Framed User - A Framed Protocol should be started for the User, such as PPP or SLIP.
-
EAP Type Restriction - Enables/Disables EAP Protocol Type Restriction. If enabled, you can restrict authentication to the selected EAP Protocol(s) below.
-
EAP-PEAP - Restricts authentication to EAP-PEAP Protocol.
-
EAP-TLS - Restricts authentication to EAP-TLS Protocol.
-
-
-
Callback Login User - The user should be disconnected and called back, then connected to a host.
-
Callback Framed User - The user should be disconnected and called back, then a Framed Protocol should be started for the User, such as PPP or SLIP.
-
Outbound User - The user should be granted access to outgoing devices.
-
Administrative User - The user should be granted access to the administrative interface to the NAS from which privileged commands can be executed. (IETF rfc2865)
-
NAS Prompt User - The user should be provided a command prompt on the NAS from which non-privileged commands can be executed. (IETF rfc2865)
-
Authenticate Only - Only Authentication is requested, and no authorization information needs to be returned in the Access-Accept (typically used by proxy servers rather than the NAS itself). (IETF rfc2865)
-
Callback NAS Prompt - The user should be disconnected and called back, then provided a command prompt on the NAS from which non-privileged commands can be executed. (IETF rfc2865)
-
-
NAS Identifier - Enter the NAS Identifier.
-
NAS Port Type - This attribute indicates the type of physical port of the NAS that is authenticating the user. It can be used instead of, or in addition to, the NAS-Port attribute. It is only used in Access-Request packets. Either NAS-Port or NAS-Port-Type or both should be present in an Access-Request packet if the NAS differentiates among its ports.
-
NAS Port ID - Enter the NAS port ID.
-
Alcatel Port Description - Enter the Alcatel Port Description.
-
Alcatel Device Name - Enter the Alcatel Device Name.
-
Alcatel Device Location - Enter the Alcatel Device Location.
-
Alcatel AP Group - Enter the Alcatel AP Group Name.
-
-
-
Operator - Select a condition operator.
-
Value - Select a condition value. Enter at least one value. A maximum of 32 values are allowed.
If you select “IMSI/IMEI Database” for the Authentication Source, the Mapping Condition fields are automatically set to the following values and are no longer configurable:
-
Attribute = “Service-Type”
-
Operator = “Equals”
-
Value - “Authorize Only”
Click on Add Condition to add another mapping condition to the Access Policy.
Authentication Method

-
Allow All EAPs - Enables/Disables the use of all EAP methods supported by UPAM, Authenticator, and the client device. By default, this option is set to “Yes” (Enabled). When disabled, select the allowed EAP methods:
-
EAP-TLS - Restricts authentication to EAP-TLS Protocol.
-
EAP-PEAP - Restricts authentication to EAP-PEAP Protocol.
-
EAP-TTLS - Restricts authentication to EAP-TTLS Protocol.
-
If you select “IMSI/IMEI Database” for the Authentication Source, the Authentication Method is not configurable.
Authentication Strategy

-
Authentication Source - Specify the source of the user profile (Account/Password). The user profile can reside on different servers and is required to be specified so that UPAM is able to obtain the user profile for authentication.
-
None - Authenticate against “None”. This is only supported for MAC authentication, which requires captive portal authentication. 802.1x Authentication is not supported. In this case, a user needs to pass captive portal authentication first (authentication method could be by Account + Password/Access Code/Terms of Use/etc.), the MAC address of the user will be stored and the user will complete the MAC authentication. Guest user devices are displayed in the Guest Devices - Guest Remembered Device list. Employee user devices are displayed in the BYOD Devices - Remember Devices list.
-
Local Database - Authenticate against the user profile in the local UPAM database. An Employee or Guest user must be created before authentication. An Employee Guest User is created on the Employee Accounts screen. A Guest User is created on the Guest Accounts Screen.
-
IMSI/IMEI Database - Authenticate against the user profile in the UPAM IMSI/IMEI database. Select this database when configuring UPAM integration with Celona devices.
Note: When you select the IMSI/IMEI database, the following Access Policy attributes are no longer configurable: -
External Radius - Authenticate against the user profile in an external RADIUS Server. Select a server from the External Radius drop-down. If necessary, you can click on Create External RADIUS Server to go to the Create External Radius Server screen to create a server.
-
External LDAP Server - Authenticate against the user profile in an external LDAP Server. Select a server from the External LDAP server drop-down. If necessary, you can click on Create External LDAP Server to go to the Create External LDAP Server screen to create a server.
-
Cloud Identity - Authenticate against the user profile with Azure Active Directory via the Certificate Connector for Microsoft. Azure AD has the ability to synchronize with on-premise Active Directory, providing authentication access to OmniVista Terra.
-
In this release of UPAM, cloud identity is only available for devices that use 802.1X authentication. Cloud identity cannot be used with BYOD or Guest Captive Portal at this time.
Network Enforcement Policy
-
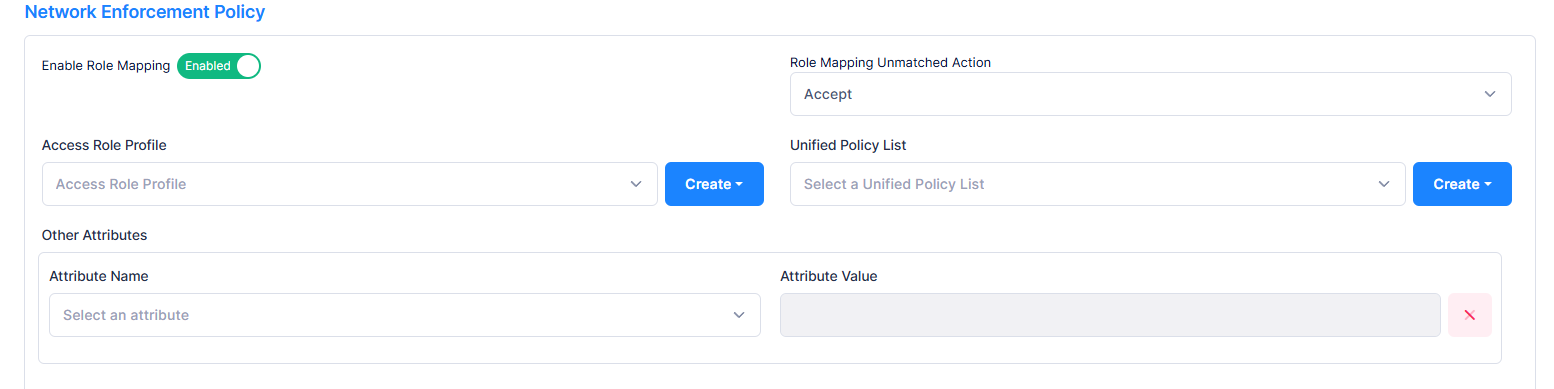
Enable Role Mapping - Enables or disables role mapping for LDAP authentication sources using external LDAP. By default, it is disabled.
-
Role Mapping Unmatched Action - Accept or Reject user authentication with 802.1x matching with Access Policy.
-
Access Role Profile - Select the Access Role Profile from the drop-down list. If necessary, you can click on Create Access Role Profile to go to the Create Access Role Profile screen to create a profile. Note that this field is not available when the Authentication Source is set to the IMSI/IMEI database.
-
Unified Policy List - Select a Unified Policy List from the drop-down list. If necessary, you can click on Create Unified Policy List to go to the Create Unified Policy List screen to create a policy list. Note that this field is not available when the Authentication Source is set to the IMSI/IMEI database.
-
Other Attributes - Select the required attributes and provide values.
-
Acct-Interim-Interval - Interval for RADIUS accounting, in seconds. If not configured, the device's default accounting policy will take effect. (Range = 60 - 1200, Default = 600).
-
Session-Timeout - The Session Timeout Interval is the maximum number of consecutive seconds of connection allowed to the user before termination of the session or prompt. If not configured, the device's default session timeout policy will take effect. (Range = 12000 - 86400, Default = 43200).
-
Tunnel-Private -Group-ID - The Tunnel Private Group ID is used to determine the UNP for the device, if applicable. Tunnel Private Group ID is a RADIUS attribute that indicates the group ID for a particular tunnel session. It may be included in the Access-Request packet if the tunnel initiator can pre-determine the group resulting from a particular connection, and should be included in the Access-Accept packet if this tunnel session is to be treated as belonging to a particular private group. In most cases, L2 VLAN domain is a private group, and the Tunnel Group ID is pointing to the VLAN ID. (Range = 1 - 4094)
-
WISPr-Bandwidth-Max-Down - The user downstream bandwidth, in kbit/s. Value must be in range [0 - 2147483]. By default or set it to 0, it is not limited.
-
WISPr-Bandwidth-Max-Up - The user upstream bandwidth, in kbit/s. Value must be in range [0 - 2147483]. By default or set it to 0, it is not limited.
-
Reply-Message - This attribute is automatically entered in the “Other Attributes” field when the IMSI/IMEI database is selected for the Authentication Source. Enter the name of the Celona Access Role Profile.
-
Mac Check Enforcement Policy
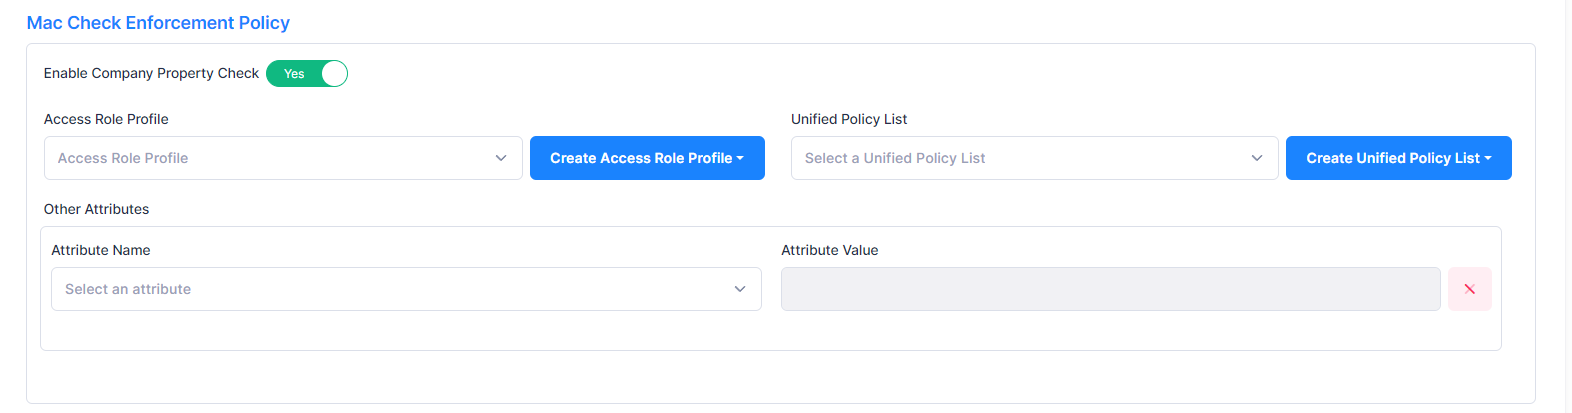
Specifies whether or not to check to see if the device MAC address is in the Company Property database. By default MAC Check Enforcement Policy is disabled. When it is enabled, you have the option to specify an Access Role Profile, Policy List, or other attributes for when the check is successful (MAC address is in the database) and for when the check fails (MAC address is not in the Company Property database).
-
Enable Company Property Check - Enables/Disables checking to see if the device MAC address is in the Company Property database. The Company Property Check is disabled (“No”) be default. When enabled, configure the following:
-
Access Role Profile - Select the Access Role Profile from the drop-down list. If necessary, you can click on Create Access Role Profile to go to the Create Access Role Profile screen to create a profile.
-
Unified Policy List - Select a Unified Policy List from the drop-down list. If necessary, you can click on Create Unified Policy List to go to the Create Unified Policy List screen to create a policy list.
-
Other Attributes - Select the required attributes and provide values.
-
Acct-Interim-Interval - Interval for RADIUS accounting, in seconds. If not configured, the device's default accounting policy will take effect. (Range = 60 - 1200, Default = 600).
-
Session-Timeout - The Session Timeout Interval is the maximum number of consecutive seconds of connection allowed to the user before termination of the session or prompt. If not configured, the device's default session timeout policy will take effect. (Range = 12000 - 86400, Default = 43200).
-
Tunnel-Private -Group-ID - The Tunnel Private Group ID is used to determine the UNP for the device, if applicable. Tunnel Private Group ID is a RADIUS attribute that indicates the group ID for a particular tunnel session. It may be included in the Access-Request packet if the tunnel initiator can pre-determine the group resulting from a particular connection, and should be included in the Access-Accept packet if this tunnel session is to be treated as belonging to a particular private group. In most cases, L2 VLAN domain is a private group, and the Tunnel Group ID is pointing to the VLAN ID. (Range = 1 - 4094)
-
WISPr-Bandwidth-Max-Down - The user downstream bandwidth, in kbit/s. Value must be in range [0 - 2147483]. By default or set it to 0, it is not limited.
-
WISPr-Bandwidth-Max-Up - The user upstream bandwidth, in kbit/s. Value must be in range [0 - 2147483]. By default or set it to 0, it is not limited.
-
-
Consider the following when an Access Policy with Company Property Check enabled is applied:
-
If the device MAC address is found in the Company Property database (MAC check is successful), UPAM applies the Access Role Profile or Unified Policy List associated with the matching Company Property entry to the device. If the matching Company Property entry does not specify an Access Role Profile or Unified Policy List, then the profile and list specified in the MAC Check Enforcement Policy for the Access Policy is applied.
-
If the device MAC address is not found in the Company Property database (MAC check fails), the following occurs:
-
For Portal Authentication, UPAM checks the following (in order) to obtain an Access Role Profile or Unified Policy List to apply to the device:
-
The Access Role Profile or Unified Policy List for the Account (LDAP Role mapping/Guest/BYOD).
-
The Access Role Profile or Unified Policy List under “Post Portal Authentication Enforcement” for BYOD/Guest Strategy.
-
The Access Role Profile or Unified Policy List specified in “Network Enforcement Policy” of the Access Policy.
-
-
-
If you select “IMSI/IMEI Database” for the Authentication Source, enabling Company Property Check is not available.
Local Authorization

To use Local Authorization, Local Database as the authentication source and only EAP-TLS as the authentication method must be configured.
-
Enable Local Authorization - By default, this is disabled. Enable it to activate local certificate authorization rule evaluation.
-
Local Authorization Unmatched Action - Action to apply when no rule matches. (Accept or Reject).
Web Redirection Enforcement Policy
-
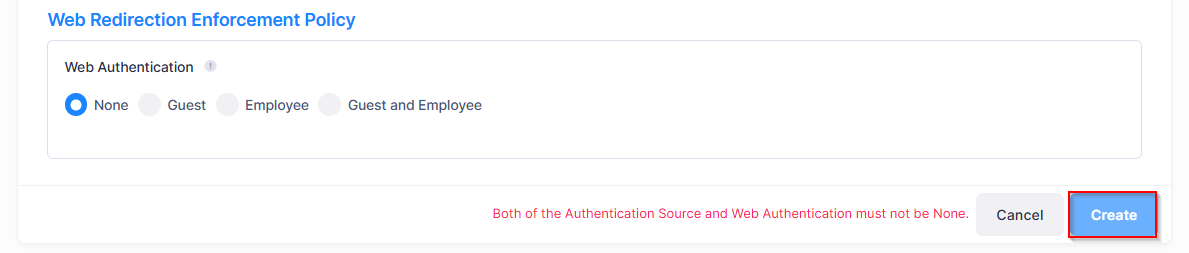
Web Authentication
Specify if web redirection is required and identify the web login page to use for authentication.-
Guest - Specifies an access strategy for guest users. The user is redirected to the guest login page for the Guest Access Strategy.
-
Guest Access Strategy - Select the access strategy from the drop-down list. If necessary, you can click on Create Guest Access Strategy to go to the Create Guest Access Strategy screen to create a guest access strategy.
-
-
Employee - Specifies an access strategy for employee users with BYOD devices. The user is redirected to the employee login page for the BYOD Access Strategy.
-
BYOD Access Strategy - Select the access strategy from the drop-down list. If necessary, you can click on Create BYOD Access Strategy to go to the Create New BYOD Access Strategy screen to create a BYOD access strategy.
-
-
Guest and Employee - Specify both a Guest and Employee access strategy. The user is redirected to a login page with the following two options:
-
Register as Guest (Guest configuration) - Click on this option to open the guest login page for the Guest Access Strategy.
-
Network Account Login (BYOD configuration) - Click on this option to open the employee login page for the BYOD Access Strategy.
-
-
-
Both the Authentication Source and Web Authentication must not be set to “None”.
-
If you select “IMSI/IMEI Database” for the Authentication Source, configuring Web Authentication is not available.
Editing an Access policy
You can edit the parameter values for an existing Access Policy by accessing the Edit Access Policy screen.
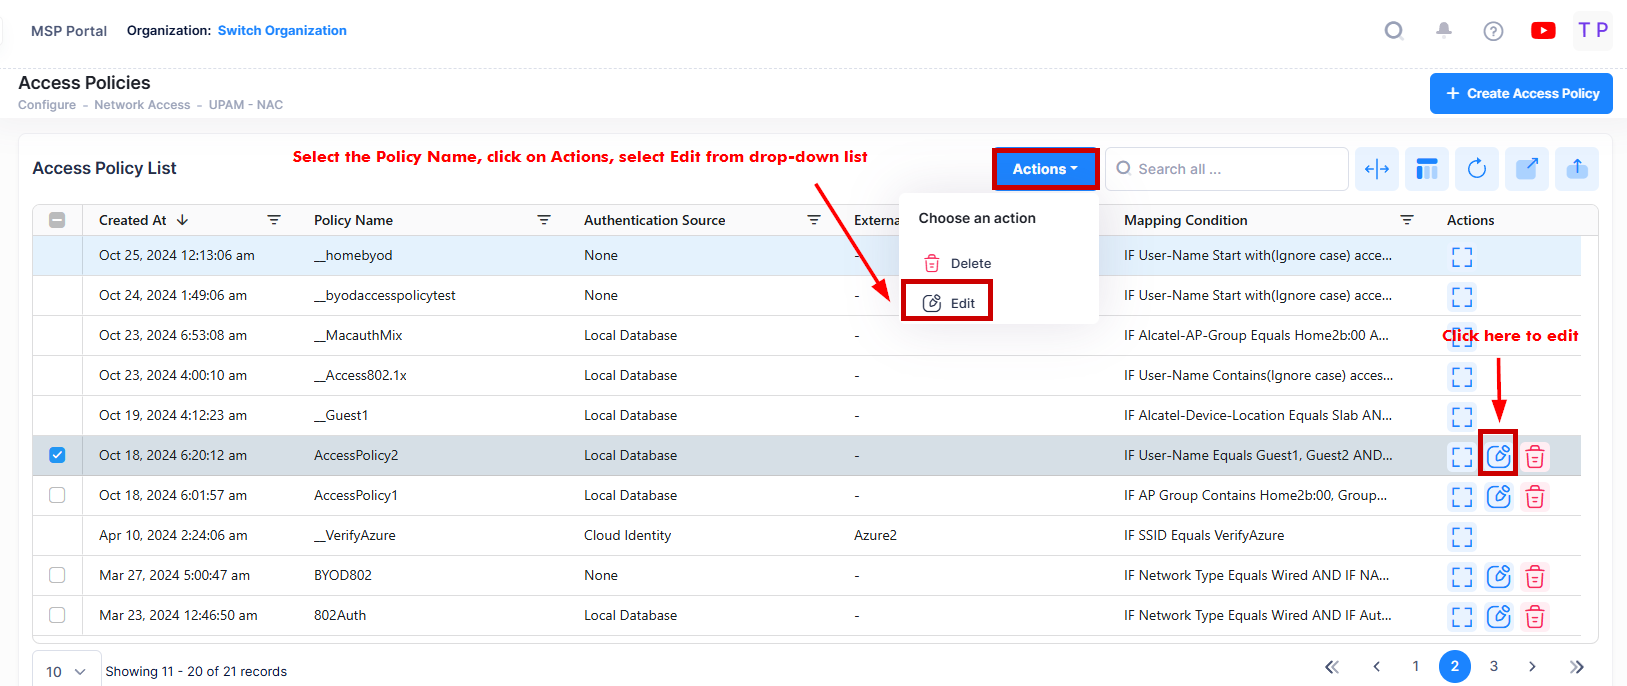
Use one of the following methods to access the Edit Access Policy screen (as shown above):
-
Select the policy to edit by clicking on the checkbox next to the policy name, click on Actions, then select Edit from the drop-down menu.
-
Click on the pencil icon under the “Actions” column next to the policy name that you want to edit.
The following Edit Access Policy screen displays. Edit the fields as described above, then click on Save.
Delete an Access Policy
To delete an Access Policy, use one of the following methods to select the policy you want to delete:
-
Select the policy to delete by clicking on the checkbox next to the policy name, click on Actions, then select Delete from the drop-down menu.
-
Click on the trash can icon under the “Actions” column next to the policy name that you want to delete.
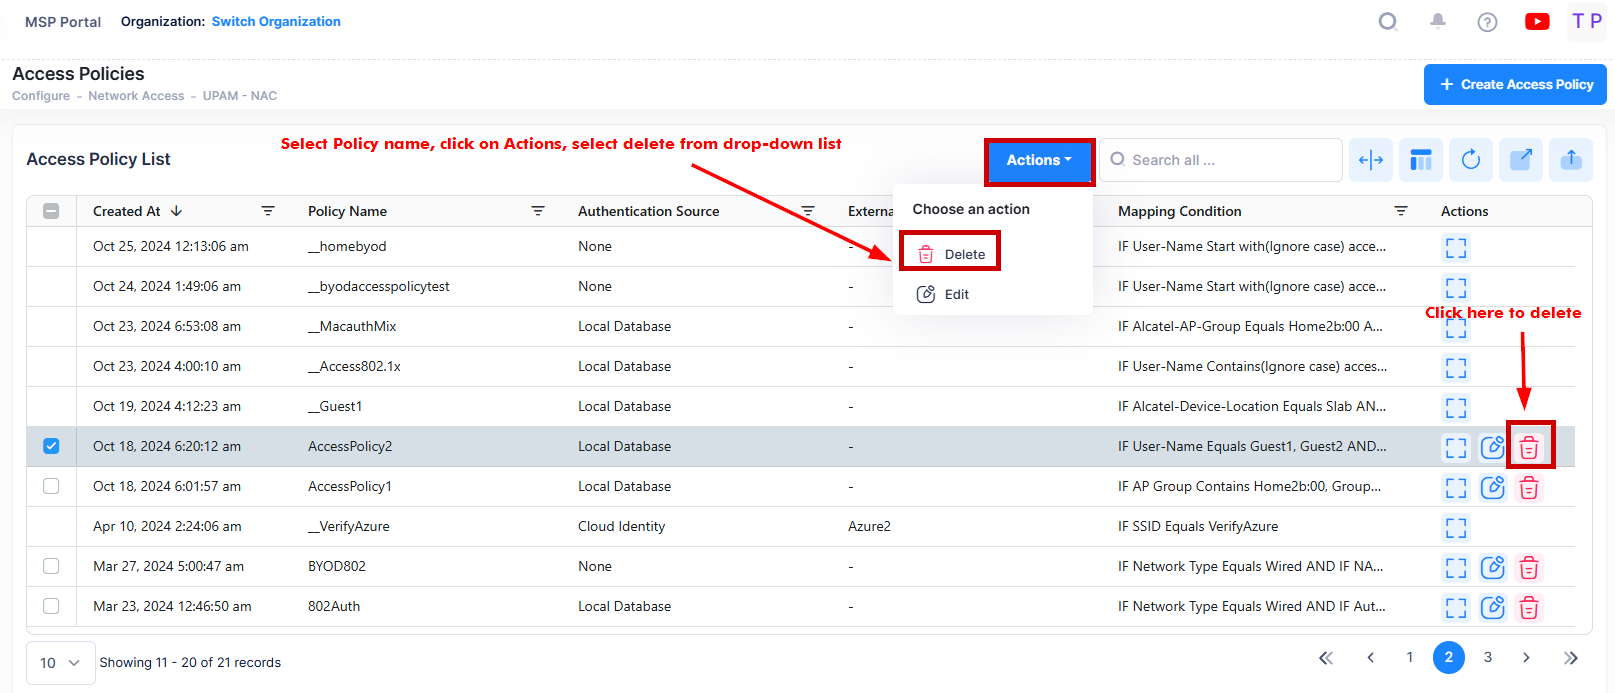
When you select the policy you want to delete, the following confirmation prompt appears:
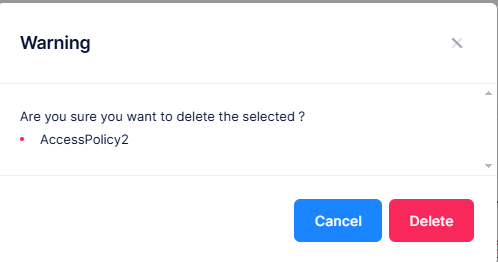
Click on Delete to confirm that you want to delete the Access Policy.
Display Access Policy List
The Access Policy list displays information for the configured Access Policies. To display detailed information about a specific policy, click on the Additional Information icon under the “Actions” column. The information displayed on this screen is defined below.
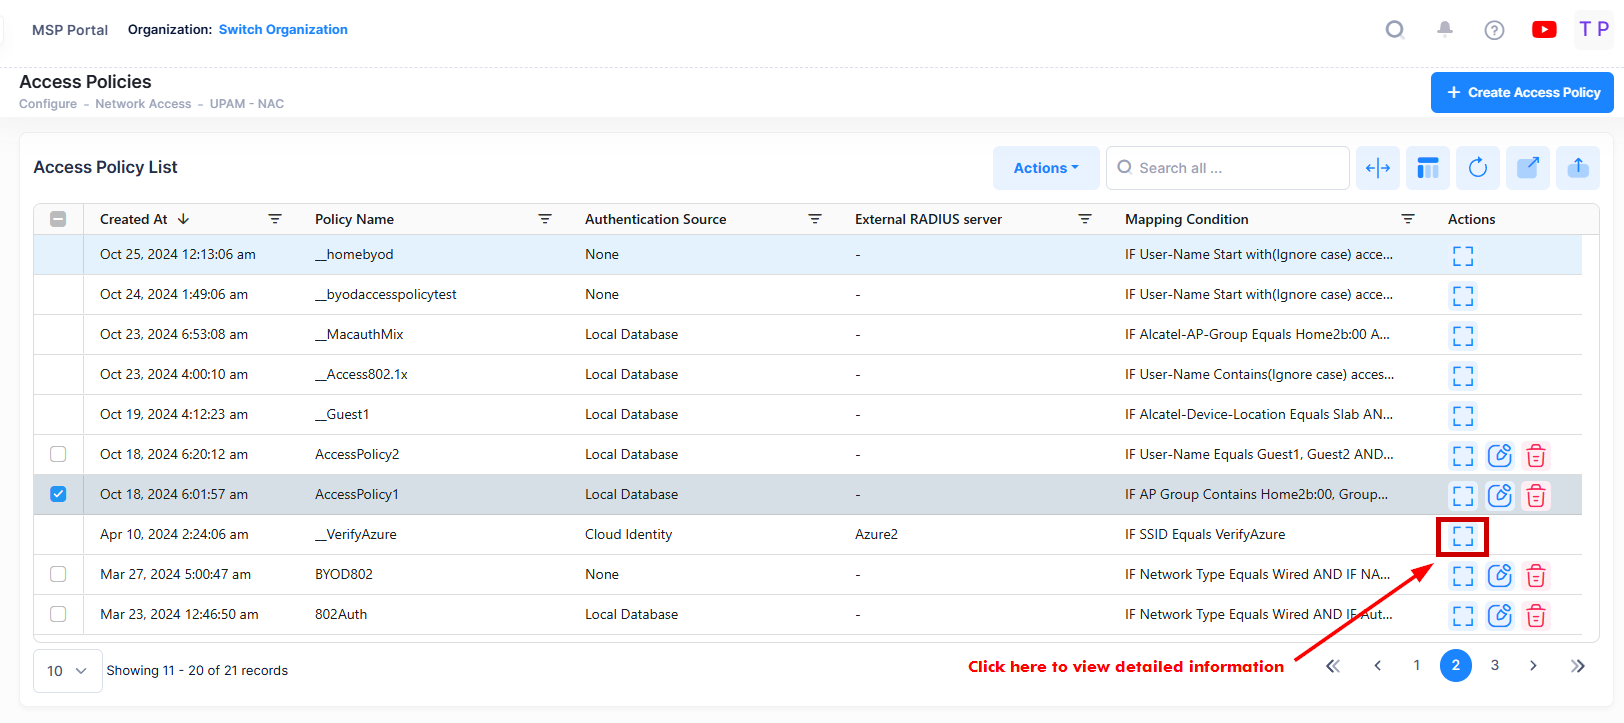
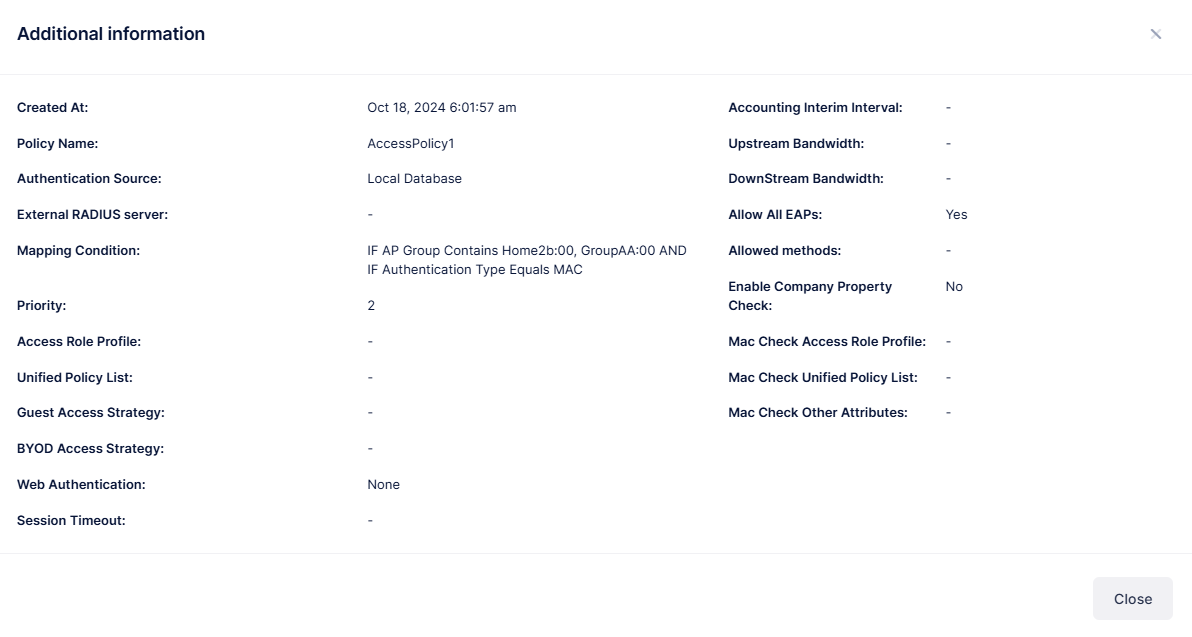
The following information is displayed for each Access Policy:
-
Created At - The date and time the policy was created.
-
Policy Name - User configured policy name.
-
Authentication Source - The source of the user profile (Account/Password). The user profile can reside on different servers and is required so that UPAM is able to obtain the user profile for authentication.
-
External RADIUS Server - Authenticate against the user profile in an external RADIUS Server. You can select a server from the External Radius drop-down menu while creating the profile.
-
Mapping Condition - Specifies the conditions that client traffic should match for this policy to be applied to the client. At least one condition is mandatory.
-
Priority - The priority set for the Access Policy. The policy with the highest priority take effect after passing the authentication.
-
Access Role Profile - The name of the Access Role Profile applied for Network Enforcement.
-
Unified Policy List - The name of the Unified Policy List applied for Network Enforcement.
-
Guest Access Strategy - The name of the Guest Access Strategy to use for Web redirection.
-
BYOD Access Strategy - The name of the BYOD Access Strategy to use for Web redirection.
-
Web Authentication - Specifies whether or not Web redirection is required.
-
Session Timeout - The maximum number of consecutive seconds of connection allowed to the user before termination of the session or prompt.
-
Accounting Interim Interval - Interval for RADIUS accounting, in seconds.
-
Upstream Bandwidth - The user upstream bandwidth, in kbit/s.
-
Downstream Bandwidth - The user downstream bandwidth, in kbit/s.
-
Allow All EAPs - Indicates if all of the EAP methods supported by UPAM, Authenticator, and the client device are used.
-
Allowed Methods - Indicates which EAP methods are used (applies only when “Allow All EAPs” is set to “No”).
-
Enable Company Property Check - Indicates if the Company Property database is checked to see if it contains the device MAC address.
-
MAC Check Access Role Profile - The name of the Access Role Profile applied for Company Property Check.
-
MAC Check Unified Policy List - The name of the Unified Policy List applied for Company Property Check.
-
MAC Check Other Attributes - The attribute values applied for Company Property Check.